
At the end of the year, Bon Appetit published a list of great recipes for using a Dutch Oven. One included in the group was called BA’s Best Bread. I still had some time off from work and thought it would be fun to try. A classic 3-day bread starting with a poolish. In typical fashion, I really didn’t read the entire (4-page when printed) recipe, but thought it would be fun. I still had never used my Dutch oven for bread-baking, and thought I should try with a “real” recipe.
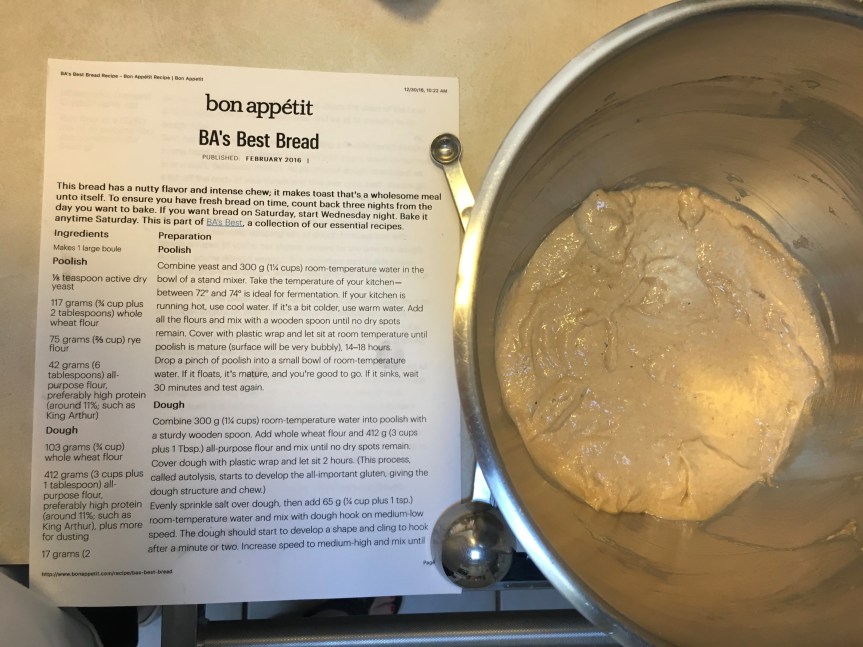
Of course, I didn’t have any rye flour, but did have white-whole wheat, since I had taken advantage of a free-shipping offer from KAF prior to the holidays. I did also have some pumpernickel flavoring from there (the flavors really are great that they sell – pumpernickel in particular – since it’s all of those minor ingredients you need, but don’t have on hand unless you bake all the time) – the first ingredient is rye flour, so I just added a teaspoon or two and made up for the rye with a bit more white whole wheat. It added a LOT of color, but probably not more than if I had used regular whole wheat anyway. Also – if you look at the photo closely – very interesting weight measurements. I do actually bake a fair amount of bread, and so I’m kind of used to the “feel” of it – these are really exact! And yes – I did weigh all of the ingredients faithfully – also, who knew how little one gram of flour actually is!
Anyhoo, poolish made and left to ferment for a day – by timing made it such that it was going to sit longer than the 14-18 hours, but it was a test for me, so it worked out how it did – I mean my life can’t be driven by a loaf of bread (even if it’s supposed to be “BA’s Best”).
The next day a lot of slapping, dropping and a little bit of kneading ensued. There was making the initial dough; letting it rise for a couple of hours; a lot of dropping of the dough back onto the counter from a height – for a while; then slapping it around in the bowl; and finally forming. This was the “work day” and the recipe warns that if you’re not tired at one point – you are really not doing it right! It was kind of fun manhandling it and dropping the dough from a a couple of feet above the counter so that you could hear a good thwack! The dough was then supposed to be placed in a kitchen towel-lined colander that was dusted with rice flour – fortunately there was an alternate – but of course, it’s really hard to get that to stick uniformly. A round of parchment is placed on top – and then the whole thing is plopped into the refrigerator for a day or two. Since this wasn’t exactly a photo-shoot – no pictures – that’s probably a good thing because I think I looked fairly ridiculous for much of the time.
Fast forward. Might even have been the 2nd day – over the holidays there are other priorities like making merry and such. I dutifully put the oven on (mine actually says it goes waaaay above 500 degrees, but I stopped there. No fear, my beautiful black Staub pot that I got last year has a metal handle on the top – no barriers or compromises. Typically, the pot gets heated for about 40 minutes, the bread is removed from the fridge, tuned over onto a plate or something so it can be slipped into said pot, and then… oh, my! there was a huge lump of flour on the top that had to be dusted off. There were also polkadots of a flour pattern due to the colander. Hmmm, but once dusted off, and a few slashes made, I successfully (ish) plopped it into the pan (parchment side down), covered it and back into the oven. 15 minutes or so covered, then another 35 or so uncovered. Guess what? it worked! with the exception of the two little spots that caught on the side of the pot when I was slipping it in – this was one beautiful loaf – if I do say so myself!

Of course, we are always stridently cautioned to not cut the bread warm. Clearly anyone who enjoys a beautiful slice of warm bread just out of the oven, slathered with butter is a Philistine. Since this was an experiment, we waited. So that it would be perfect.

We eventually did get to have some bread. And I have to say, I was pleased to see those tell-tale bubbles. The color was a little dark (drat that pumpernickel flavor!).
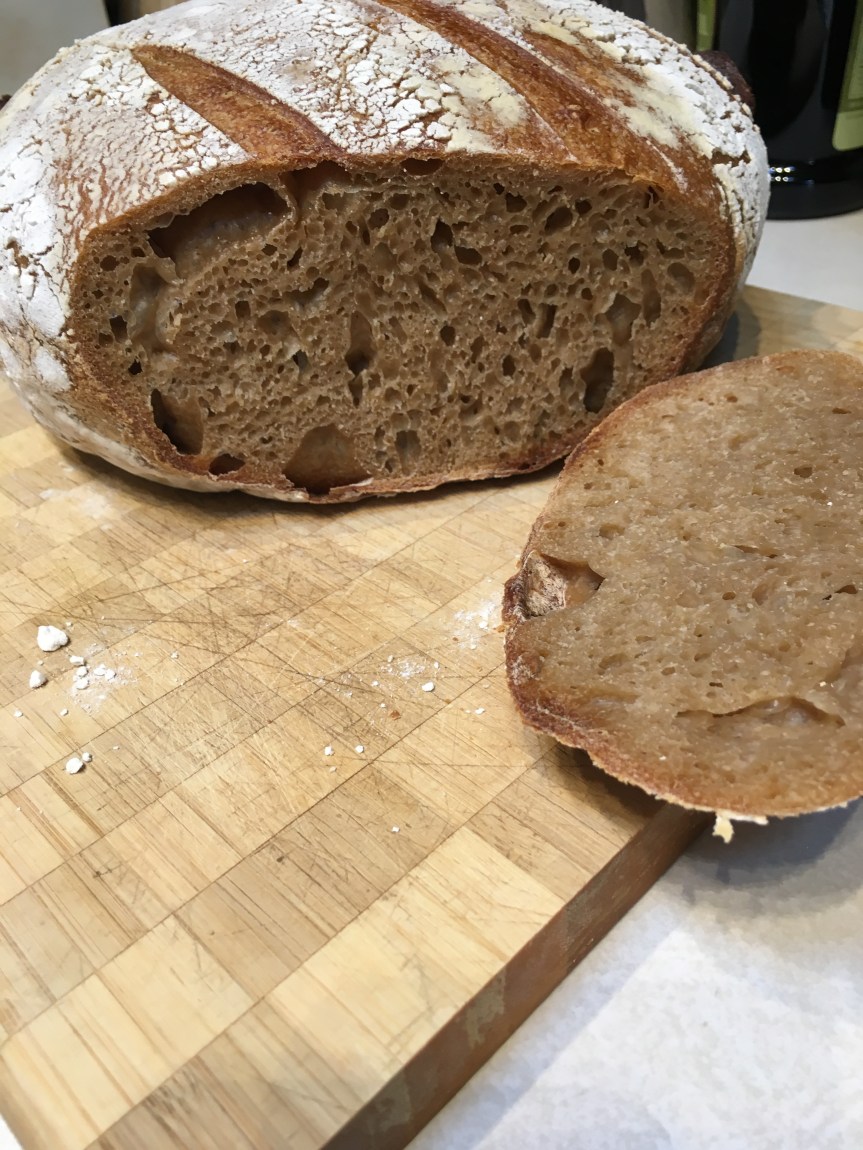
The flavor was pretty good. The texture – like all of these, maybe a little moist for me. The crust was really, really good. Perfectly chewy and very satisfying. We’ve enjoyed it plain, and as a bruschetta with ricotta, caramelized onions and roasted butternut squash (yum!) and with leftover beef and horseradish sauce. I had it toasted with an omelette. Like all breads of this kind, it changes a little over time. The crust gets pretty durable… when toasted. We are probably about half-way through it. I suspect it won’t actually be consumed (particularly since I’m making some different bread as I type).
This really was a fun project. We liked it – but it was a huge loaf, and way too much for us to eat while it was/is at its prime. I don’t know that it lived up to it’s title (seriously? this is your very best bread at BA? that’s a bit sad). But I’m very happy to have tried it. I’ve always wanted to try baking a bread with a poolish, since my friend Teri had a baking blog years ago and we would get samples (she’s the reason I ever started myself!). I’m incredibly happy with using my Dutch oven for an artisan bread. No doubt, I will go back to my normal “5-minutes a day” recipe, where I can adjust the loaf size for our use. And see if the smaller quantities of dough will work in the Dutch oven – if not, I might just have to look for a smaller one! 😉
Now, back to finishing up my Walter Sands sandwich bread – oh and some cinnamon rolls with half of the dough. I’m quite contented to be pedestrian, if that’s what I am. It will suit just fine. I’m also excited that I finally got around to a project like this.

You had me at Bread baking!! Try Jim Lahey , founder of The Sullivan Street Bakery in New York, My Bread Cookbook, no knead, no work method!!
Thanks Nilda! That’s what I usually do for that kind, I just thought I was “honor-bound” to try the poolish! hahaha! I’ll look that up to see if there are differences in what I typically do! Happy New Year!!
Wishing you an excellent year! Happy Cooking!!
You a pedestrian? Hardly! What was they temp they recommended?
😊 At least 450-500. Lots of pots have a top temperature rating of like 450, or sometimes less. Mostly it’s about the handles… the Sedona oven shows it can go higher than 500. 😬
I’m intrigued by how this might be different from no-knead bread. The ingredients and Dutch oven are similar, but the rising/kneading step are different. Yours looks just like the picture on the BA website (I looked up the restaurant). How did your next bread and cinnamon rolls turn out?
I’m so intrigued by this bread – it sounds delicious! I want to start mAking more homemade bread, as it’s a process (and result) that I love.